DTF transfers for beginners open a practical doorway into the growing world of DTF printing, guiding you from curious questions to a reliable starter setup. This guide helps you understand what DTF transfers are, the essential tools, and how to apply them with a heat press for transfers and consistent results. As you explore the process, you’ll encounter core terms like DTF film and powder, DTF transfer materials, and the flexibility that makes cotton T-shirt printing a common starting point. By focusing on a simple workflow, the content emphasizes quality, repeatability, and getting professional-looking results on fabrics with durable color. Whether you’re a designer or hobbyist, this beginner-friendly overview helps you build a practical foundation you can grow from.
Alternative terms and LSI-focused phrasing for this topic include direct-to-film workflows, film-and-powder transfer systems, and garment decoration through a carrier-film technique. Viewed as a digital-to-fabric transfer process, artwork is printed on a carrier film, dusted with adhesive powder, cured, and then fused to fabric with heat and pressure. You may also hear it described as a film transfer method, a powder-assisted transfer, or a textile printing technique that pairs a printable film with a heat press. This LSI-aligned framing helps search engines connect related concepts like DTF printing, heat press for transfers, DTF film and powder, and DTF transfer materials with practical beginner content. With this approach, you can build confidence as you learn to decorate garments, especially cotton T-shirt printing, while your vocabulary expands to include compatible terms and synonyms.
DTF Transfers for Beginners: An Essential Entry into Direct to Film Printing
DTF transfers for beginners offer a clear entry point into the world of direct to film printing. This path helps newcomers understand the core concepts of DTF printing, the role of the heat press for transfers, and how transfer materials influence results. By starting with a focused setup, you can organize your workspace to minimize waste and maximize learning.
You’ll discover why cotton T-shirt printing is a common starting project and how a repeatable workflow can produce consistent, professional-looking outcomes. The emphasis is on practical steps, essential tools, and a gentle learning curve that grows with your experience.
Choosing DTF Film and Powder for Consistent Results
DTF film and powder choice directly impact edge clarity, color vibrancy, and wash durability. Look for film designed for your printer and inks, and pair it with adhesive powder that spreads evenly across the image without clumping. Reading kit contents and manufacturer recommendations helps you avoid mismatches that cause halos or poor adhesion.
For beginners, ready-to-use kits can simplify decisions by bundling film, powder, and straightforward instructions. Testing a few designs on simple fabrics will reveal how the film and powder perform on cotton T-shirt printing and similar blends, giving you confidence before tackling more complex artwork.
Essential Tools: Building a Beginner DTF Transfer Materials Setup
A solid starter involves reliable DTF transfer materials, including film, adhesive powder, a shaker or mixer for even coating, and a curing setup. The quality of the film and powder affects color accuracy, edge detail, and how smoothly the powder adheres during the transfer process.
Create a dedicated workspace with proper ventilation and a dependable heat press for transfers. A sturdy heat-resistant mat, silicone cover sheet, and clean, lint-free surroundings help you achieve consistent results and protect your equipment as you learn.
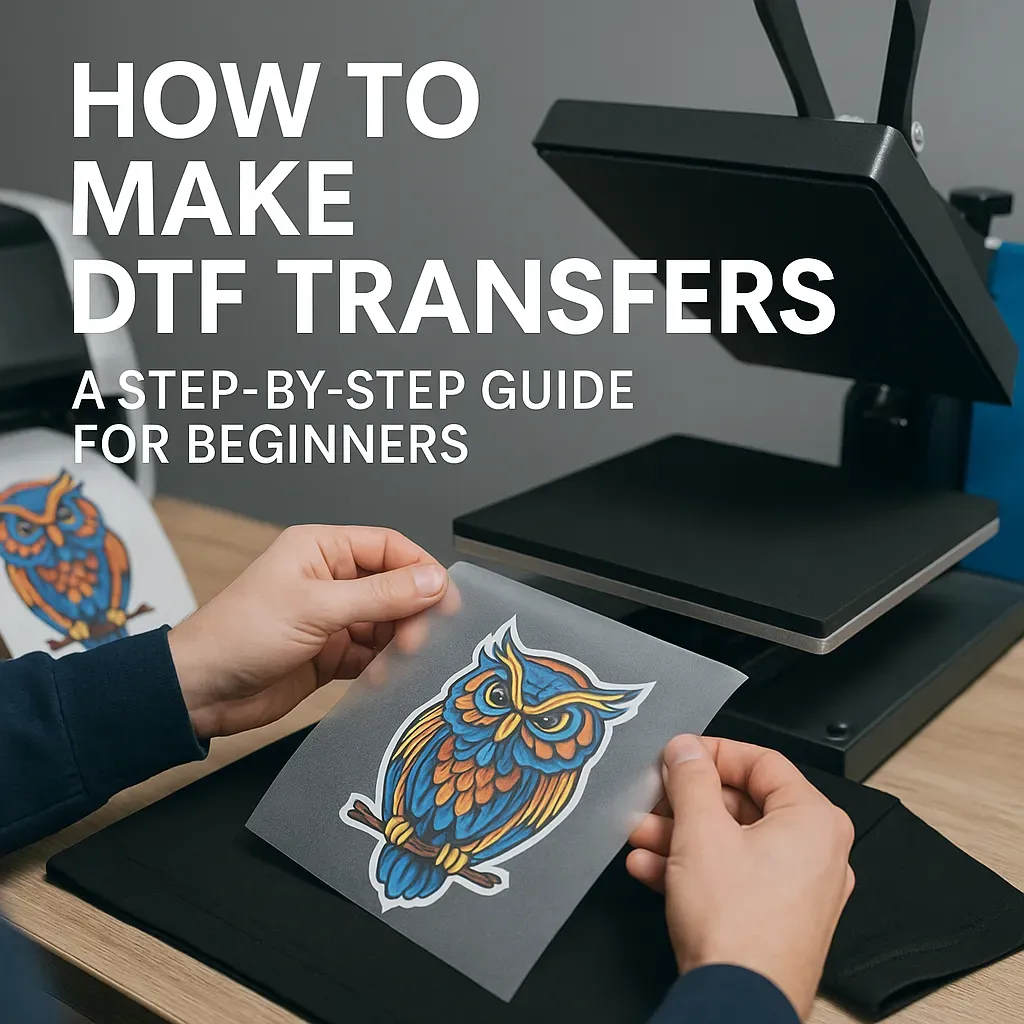
From Design to Application: The DTF Printing Process
DTF printing begins with a well-prepared design and careful color separations to maximize the capabilities of DTF film and powder. This stage uses clear printing guidelines and a printer setup designed for film media, followed by previewing output so your first run is predictable for cotton T-shirt printing.
The subsequent steps—apply adhesive powder, cure it, align the film with the fabric, and transfer using your heat press for transfers—form a repeatable workflow. With practice, you’ll refine timing, pressure, and peel methods to achieve durable, vibrant results on a range of fabrics beyond cotton.
Common Issues, Troubleshooting, and Long-Term Maintenance
Common challenges include color bleeding, halos, powder not sticking, or uneven adhesion. These issues can often be traced back to film and powder compatibility, improper curing, or misalignment during transfer, so systematic testing helps you isolate the cause in the DTF transfer materials workflow.
Ongoing maintenance—cleaning the printer area, storing DTF film and powder properly, and keeping the heat press calibrated—helps sustain consistent results. As you expand into more complex designs, documenting your settings and keeping a clean workspace supports reliable cotton T-shirt printing projects and other fabrics.
Frequently Asked Questions
What are DTF transfers for beginners and how do they work in practice?
DTF transfers for beginners describe an accessible path into direct-to-film printing that emphasizes a simple, repeatable workflow. In DTF printing, you print your design onto a special film, dust it with adhesive powder, cure the powder, and then use a heat press for transfers to apply the image to a garment. This method is particularly suitable for cotton T-shirt printing and other fabrics, offering vibrant color and a forgiving process as you learn about DTF film and powder and other transfer materials.
What essential equipment do I need to start with DTF transfers for beginners?
Essentials include DTF transfer materials (film, adhesive powder, and curing equipment), a printer capable of handling DTF film, a heat press for transfers with adjustable temperature and time, a clean workspace with ventilation, and basic tools (tweezers, lint-free cloths). This setup supports reliable results for cotton T-shirt printing and other fabrics as you start.
How should I choose DTF film and powder as part of DTF transfer materials for beginners?
To choose DTF film and powder, look for a matched system where the film suits your printer and inks and the powder is formulated for that film. Seek consistent film quality, even powder flow, and clear setup instructions. Starter kits that bundle DTF transfer materials can reduce guesswork and improve wash-fastness and color vibrancy for cotton T-shirt printing.
What is the basic workflow for a first DTF transfer on a cotton T-shirt printing project?
Basic workflow: design and prepare artwork; print onto DTF film; apply adhesive powder evenly; cure the powder; align the film on the garment and burnish; transfer with heat press at the recommended temperature, time, and pressure; peel (warm or cold per film); allow to cool and follow post-transfer care guidelines. For cotton T-shirt printing, start with a test sheet to dial in color and alignment.
What common issues do beginners face with DTF transfers for beginners and how can I troubleshoot them?
Common issues for beginners include color halos, powder not sticking, poor adhesion, and cracking edges. Troubleshooting tips: verify correct color separations and alignment, ensure even powder distribution and proper curing, confirm film and powder compatibility, adjust heat press temperature, time, and pressure in small steps, and practice on scrap fabric before final garments.
| Aspect | Summary |
|---|---|
| What is DTF printing? |
|
| Why is DTF beginner-friendly? |
|
| Standard starter setup |
|
| Essential tools & materials |
|
| Choosing film & powder |
|
| Role of the heat press |
|
| Prepress setup |
|
| Step-by-step beginner guide to the DTF transfer process |
|
| Common issues & troubleshooting |
|
| Maintenance, care & long-term considerations |
|
| Safety & best practices |
|
| Practical beginner workflow |
|
Summary
DTF transfers for beginners offer a versatile, accessible path to high-quality custom apparel. With essential tools such as DTF film and powder, a reliable heat press for transfers, and careful prepress and transfer steps, you can produce vibrant, durable designs suitable for cotton T-shirt printing and other fabrics. Start with a simple project, build your workflow, and gradually expand to more complex designs and colors. As you gain experience, you will refine your technique, reduce waste, and consistently achieve results that look as good as professional prints. Embrace the learning process, stay organized, and enjoy the creative possibilities that DTF transfers for beginners unlock.